Configure Virtual IP for NSX-T Management Cluster

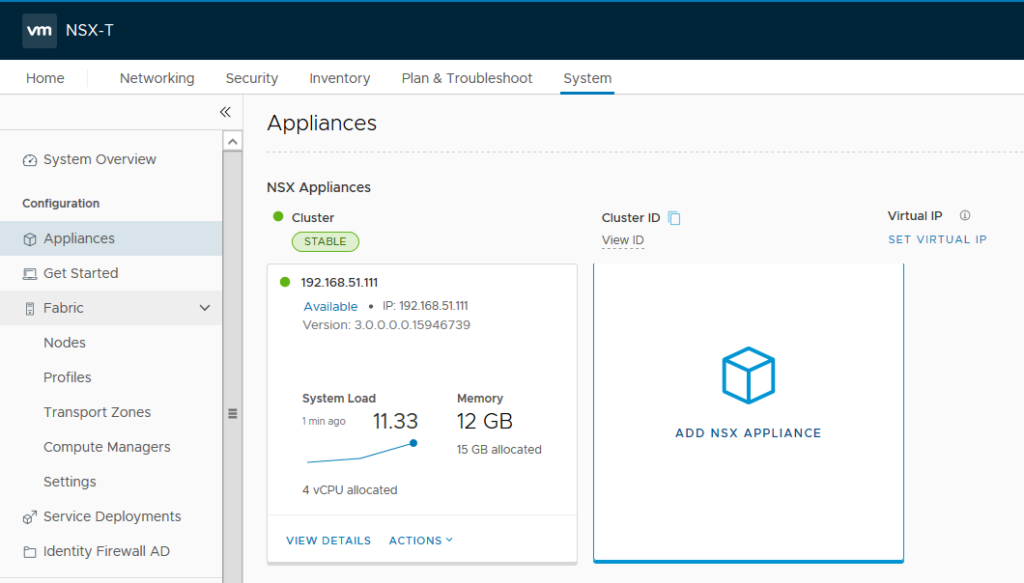
Now that we have finalize deploying three managers in NSX-T management cluster we can go ahead and configure a Virtual IP(VIP) on it. We can use NSX-T internal mechanism to set an IP address on the cluster or setup an external load balancer in front of NSX-T managers. Configuring VIP which is recommended by VMware is more simple but using a LB would load balance traffic among NSX-T managers. This is a design question and should be chosen based on requirements and customer needs.

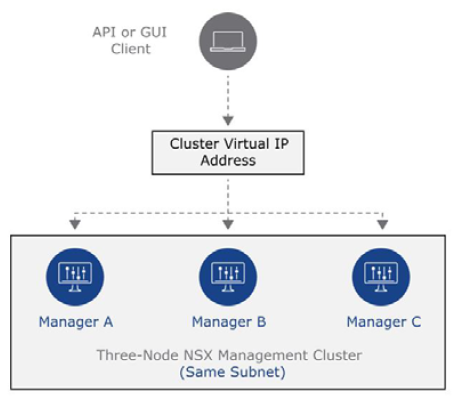
Please keep in mind that if you want to choose this approach, you need to have all NSX-T managers are on the same subnet. In this case, managers are attached to SDDC Management network. To configure Virtual IP, login to NSX-T Manager UI, choose System and on the left panel select Appliances then click on SET VIRTUAL IP option.

Continue reading “Configure Virtual IP for NSX-T Management Cluster”

Finalizing NSX-T Management Cluster Deployment

In the previous articles, we deployed first NSX-T Manager and then we added vCenter Server as Compute Manager in NSX-T Web UI. In this post we are going to finalize NSX-T Management cluster. In production environment for high availability and performance reasons, it is recommended to have three NSX-T Managers in the cluster. Second and third NSX-T Managers should be added from NSX-T Web UI. To deploy additional NSX-T manager appliances, go to System menu and choose Appliances and click on “ADD NSX APPLIANCE”.

Continue reading “Finalizing NSX-T Management Cluster Deployment”

Add Compute Manager to NSX-T 3.0

In previous blog post we started NSX-T implementation by deploying first NSX-T Manager. Before deploying other two NSX-T Managers we need to add a Compute Manager. As it defines by VMware, “A Compute Manager is an application that manage resources such as hosts and VMs. One example is vCenter Server”. We do this because other NSX-T Managers will be deployed through Web UI and with help of vCenter Server. We can add up to 16 vCenter Servers in a NSX-T Management cluster.

To add compute manager in NSX-T, It is recommended to create a service account and customized vSphere Role instead of using NSX-T default admin account. The reason behind defining a specific role is because of security reasons. As you can see in the below screen shot I created a vSphere Role call “NSX-T Compute Manager” with the required privileges. I use this Role to assign permission to the service account on vCenter Server.

Continue reading “Add Compute Manager to NSX-T 3.0”

Deploying NSX-T Management Cluster

In a previous blog post, NSX-T architecture explained and now we can start implementation of NSX-T. Deployment process of NSX-T Data Center beings with deployment of NSX-T Management cluster. In NSX-T 3.0 management cluster is consist of three NSX-T managers which include both management and control plane. The management plane provides Web UI, REST API and also interface to other management platforms like vCenter Server, vCloud Director or vRealize Automation. The Control plane is responsible for computing and distributing network run time state.

NSX-T managers can be deployed on ESXi or KVM hypervisor. If you are planning to use ESXi platform to host NSX-T managers, an OVA file should be used. On the other hand for KVM platform, a QCOW2 image will be used for NSX-T manager deployment. It is important to note that mixed deployments of managers on both ESXi and KVM are not supported. Based on type of deployment and size of environment, NSX-T manager node size configuration should be selected. Following is the four different configuration options and their requirements.

Continue reading “Deploying NSX-T Management Cluster”

NSX-T 3.0 Deep Dive

In series of blog posts we are going to walk through different steps to setup a NSX-T Data Center infrastructure. If you are new to NSX-T, please first go ahead and read the Introduction to VMware NSX. To get more insight on NSX-T architecture you can continue with NSX-T Architecture and Components post. Because we are using NSX-T 3.0 for the purpose of this implementation deep dive, you can also review What’s new in NSX-T 3.0 blog post.

https://d3utlhu53nfcwz.cloudfront.net/171901/cdnImage/article/913ec53d-8797-4531-99b8-f41e2db1ff50/?size=Box320

Following are the required steps to build a solid NSX-T Data Center foundation. Please follow each step and we are going to update and complete this list regularly.

Continue reading “NSX-T 3.0 Deep Dive”

What’s New in NSX-T 3.0

On April 7th 2020, VMware introduced next major release of its Network Virtualization & Security solution. NSX-T 3.0 introduces variety of new features which enhance the adoption of software-defined networking in private, pubic and hybrid-cloud environment.

Following are some of the new features and enhancements that are available in NSX-T 3.0 Datacenter;

Continue reading “What’s New in NSX-T 3.0”

NSX-T Architecture & Components

As it mentioned in Introduction to VMware NSX , NSX-T Datacenter is built on three integrated layers of components which are Management Plane, Control plane & Data plane. This architecture and separation of key roles enables scalability without impacting workloads.

NSX-T Management cluster which built from three-node NSX-T managers controller nodes. Management plane and control plane are converged on each node. NSX managers provides Web-GUI and REST API for management purposes. This is one of the architectural difference compared to NSX-V which had to integrate into vSphere Client & vCenter server. NSX Manager is also could be consumed by Cloud Management Platform(CMP) like vRealize Automation to integrate SDN into cloud automation platforms. NSX-T Manager can also connect to vSphere infrastructure through integration with vCenter Server(Compute Manager).

Continue reading “NSX-T Architecture & Components”

NSX-T Password Expiration

NSX-T has a default password expiration policy of 90 days for NSX-T Manager and NSX-T Edges. As soon as this expiration period passes, at the login page of NSX-T Manager an error appears complaining that “Your password has expired”. As a result, you are not able to login to NSX-T Manager.

To solve this issue, login to NSX Manager’s virtual appliance through SSH. Enter admin as the username and use current password to login. After login in NSX Manager, you will be asked to change your password because it is expired. This is the way you can reset NSX Manager admin’s password.

Continue reading “NSX-T Password Expiration”