Configure NSX-T 3.0 RBAC with Native Active Directory Integration

One of the new features which has been added to NSX-T 3.0 is supporting RBAC with Native Active Directory. In previous version of NSX-T we had to use VMware Identity Manager (vIDM) to be able to add users and groups from Active Directory for RBAC purposes. In set posts I have already described how to install and configure vIDM with NSX-T. I still believe configuring RBAC through vIDM has some added value like Multi-Factor Authentication(MFA).

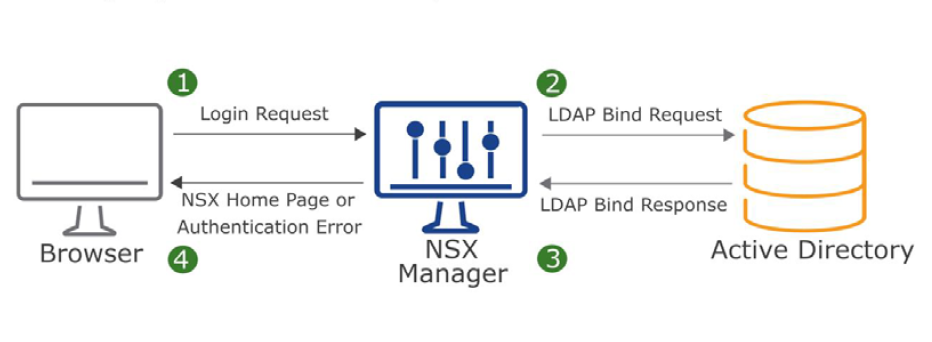
To setup NSX-T Role-based Access Control(RBAC) it’s better to create groups in Active Directory and add users into the group for two reasons. First it’s easier to add a group with couple of users as members rather than assign role to many users in NSX-T. Second, with help of Group Policy you can define a “Restricted Group” and it locks down membership to that group. As a result it provides a layer of security.

Continue reading “Configure NSX-T 3.0 RBAC with Native Active Directory Integration”

Add Compute Manager to NSX-T 3.0

In previous blog post we started NSX-T implementation by deploying first NSX-T Manager. Before deploying other two NSX-T Managers we need to add a Compute Manager. As it defines by VMware, “A Compute Manager is an application that manage resources such as hosts and VMs. One example is vCenter Server”. We do this because other NSX-T Managers will be deployed through Web UI and with help of vCenter Server. We can add up to 16 vCenter Servers in a NSX-T Management cluster.

To add compute manager in NSX-T, It is recommended to create a service account and customized vSphere Role instead of using NSX-T default admin account. The reason behind defining a specific role is because of security reasons. As you can see in the below screen shot I created a vSphere Role call “NSX-T Compute Manager” with the required privileges. I use this Role to assign permission to the service account on vCenter Server.

Continue reading “Add Compute Manager to NSX-T 3.0”