NSX-T Distributed Firewall – Part 2

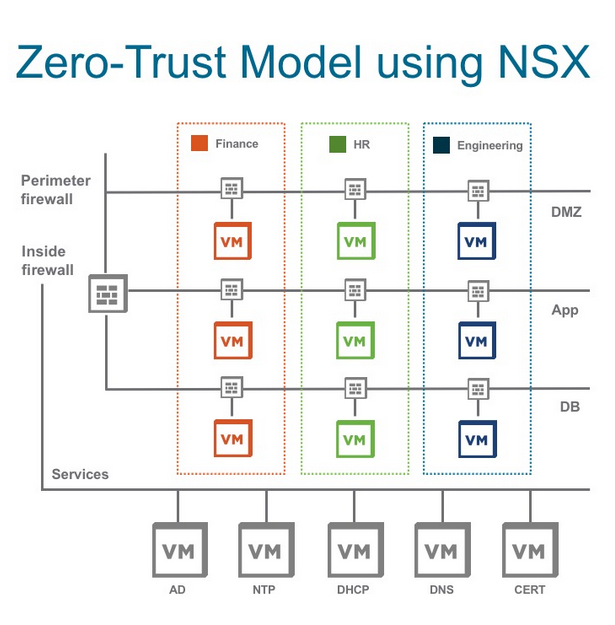
In the first part of NSX-T Distributed Firewall, I explained the importance of embracing NSX-T DFW. In this post, I review how you can create and apply firewall rules to implement Micro-segmentation. To create firewall rules, first you need to define a Policy section which basically contains one or more firewall rules. A policy in NSX-T DFW can be defined as stateful or stateless. In the case of being stateless, you need to define the rules in both directions. Otherwise, the reverse traffic is not allowed to pass. On the other hand, in the default stateful mode, when you define a rule it will apply bidirectionally.

Then you need to define the rules under the policy section which evaluates the criteria of a traffic flow. DFW rules determine whether the traffic should pass or get dropped based on the protocol and ports.

Continue reading “NSX-T Distributed Firewall – Part 2”

NSX-T Distributed Firewall – Part 1

Before jumping to NSX-T Distributed Firewall (DFW) concept and rule creation, I want to point out why this solution is important and what security issues can be addressed by using this powerful solution. Building a zero trust model security has been the biggest concern of network and security teams. In traditional data centers, high-level segmentation is built, which could help to prevent various types of the workload from communicating. But the main challenge of the legacy security model is data centers facing a lack of lateral prevention communication system between workloads within a tier. In other words, traffic can traverse freely inside a network segment and access the crucial information until it reaches the physical firewall to get dropped. In addition, implementing different layers of security and firewalls would cause complexity and cost.

NSX-T Distributed Firewall (DFW) is a hypervisor kernel-based firewall that monitors all the East-West traffic and could be applied to individual workloads like VM and enforce zero-Trust security model. Micro-segmentation logically divides department or set of applications into security segments and distribute firewalls to each VM.

Continue reading “NSX-T Distributed Firewall – Part 1”

vCenter Server 7.0 HTML5 UI error “no healthy upstream”

After upgrading to vCenter 7 Update 1 , when I tried to browse vCenter HTML5 UI, I faced “no healthy upstream” error. I could access to vCenter Management Interface (VAMI) https://vCenter-IPaddress:5480 without any issues. I could also connect to vCenter Server through  SSH but I realized couple of vCenter Server services could not start.

Continue reading “vCenter Server 7.0 HTML5 UI error “no healthy upstream””

vSphere 7.0 Update 1 is now Globally Available!

vSphere 7.0 introduced by VMware in March 2020 and went to GA in April 2020. Many new features like DRS & vMotion improvement and also Lifecycle Manager has been released. After half a year VMware introduced first major update on vSphere 7 and today this release went into GA. It is now publicly available, you can download it from VMware and take advantage of this latest and greatest release! Here in this blog post I will go through the new features and capabilities

3 Pillars of vSphere 7 Update 1
Continue reading “vSphere 7.0 Update 1 is now Globally Available!”

NSX-T 3.0 SSL Certificate Replacement – Part 2

In Part 1 of NSX-T SSL Certificate Replacement, the process of certificate template preparation and request has been explained. This blog post will teach you how to import and replace the generated certificate into NSX-T Manager. It is really important to verify the imported certificate before replacing it. I want to point out that if you are using a Virtual IP for you NSX-T management cluster, you should have generated the SSL certificate for management cluster’s Virtual IP address.

https://miro.medium.com/max/1200/1*3Ntz8MAEObg_dW10I9-RfQ.png
Continue reading “NSX-T 3.0 SSL Certificate Replacement – Part 2”

Configure Virtual IP for NSX-T Management Cluster

Now that we have finalize deploying three managers in NSX-T management cluster we can go ahead and configure a Virtual IP(VIP) on it. We can use NSX-T internal mechanism to set an IP address on the cluster or setup an external load balancer in front of NSX-T managers. Configuring VIP which is recommended by VMware is more simple but using a LB would load balance traffic among NSX-T managers. This is a design question and should be chosen based on requirements and customer needs.

Please keep in mind that if you want to choose this approach, you need to have all NSX-T managers are on the same subnet. In this case, managers are attached to SDDC Management network. To configure Virtual IP, login to NSX-T Manager UI, choose System and on the left panel select Appliances then click on SET VIRTUAL IP option.

Continue reading “Configure Virtual IP for NSX-T Management Cluster”

Add Compute Manager to NSX-T 3.0

In previous blog post we started NSX-T implementation by deploying first NSX-T Manager. Before deploying other two NSX-T Managers we need to add a Compute Manager. As it defines by VMware, “A Compute Manager is an application that manage resources such as hosts and VMs. One example is vCenter Server”. We do this because other NSX-T Managers will be deployed through Web UI and with help of vCenter Server. We can add up to 16 vCenter Servers in a NSX-T Management cluster.

To add compute manager in NSX-T, It is recommended to create a service account and customized vSphere Role instead of using NSX-T default admin account. The reason behind defining a specific role is because of security reasons. As you can see in the below screen shot I created a vSphere Role call “NSX-T Compute Manager” with the required privileges. I use this Role to assign permission to the service account on vCenter Server.

Continue reading “Add Compute Manager to NSX-T 3.0”

NSX-T 3.0 Deep Dive

In series of blog posts we are going to walk through different steps to setup a NSX-T Data Center infrastructure. If you are new to NSX-T, please first go ahead and read the Introduction to VMware NSX. To get more insight on NSX-T architecture you can continue with NSX-T Architecture and Components post. Because we are using NSX-T 3.0 for the purpose of this implementation deep dive, you can also review What’s new in NSX-T 3.0 blog post.

https://d3utlhu53nfcwz.cloudfront.net/171901/cdnImage/article/913ec53d-8797-4531-99b8-f41e2db1ff50/?size=Box320

Following are the required steps to build a solid NSX-T Data Center foundation. Please follow each step and we are going to update and complete this list regularly.

Continue reading “NSX-T 3.0 Deep Dive”

VMware vSAN 7.0 Witness Appliance Deployment

As part of vSAN Stretched or 2-Node cluster configuration, a witness appliance should be deployed and configured. This witness appliance will host witness components that are being used in split-brain failure scenarios. The witness component will act as a tie-breaker and help vSAN cluster to satisfy the quorum requirements. The witness server could be installed as a dedicated physical ESXi host or a specialized virtual witness appliance can be used instead. The main reason for having witness as a virtual appliance is it does not require an extra vSphere license to consume and eventually save some cost especially for smaller implementation like ROBO. The other reason behind using a virtual appliance is for multi-cluster environments like VCF stretched cluster implementation. Due to the reason of each vSAN cluster needs its own witness, then you can consolidate all of them on one physical host on a third site.

https://blogs.vmware.com/virtualblocks/files/2016/11/SCDIAG.png
Continue reading “VMware vSAN 7.0 Witness Appliance Deployment”

Deploying & Configuring VMware Identity Manager (vIDM) – Part 2

Following the first blog post about deployment of vIDM, this post will cover how to configure vIDM and implement NSX-T Role Based Access Control (RBAC) with help of vIDM. As you might noticed, in NSX-T 2.5 and earlier release RBAC cannot be enabled without use of vIDM.

When you login to administration page with vIDM’s admin user account, dashboard would be the fist page you will land. Dashboard contains login information and applications which are used by users and analytics.

To start vIDM configuration click on Identity & Access Management. Here you can join vIDM to Active directory domain, add directory to sync with vIDM and define user attributes which get synchronized from directory service to vIDM.

Continue reading “Deploying & Configuring VMware Identity Manager (vIDM) – Part 2”